CopyNES
CopyNES no te permite jugar a juegos por stream ni emular nada. Es una utilidad para dumpear juegos, cosa que los cartuchos flash no pueden hacer. Si consigues un cartucho flash podrás jugar a ciertos juegos o códigos caseros mientras que con este aparato podrás:
- Leer cartuchos de NES y famicom (estos con un Honeybee o adaptador similar).
- Leer partidas salvadas.
- Escribir partidas salvadas.
- Detectar automáticamente tamaño del ROM, WRAM...
- Con un cartucho NSF te permite escuchar NSFs hasta de 128K de tamaño.
- Con un cartucho RAM, puede actuar como un sistema de desarrollo brutal con un tiempo de acceso rápido.
- Podrás hacer más cosas en un futuro.
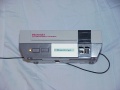
CopyNES es básicamente un frontloader de NES modificado. Esto es un pequeño añadido para la placa y un conector DB-25 montando en la parte trasera que permite conectar la NES al PC por LPT1. El prototipo original tenia LCD pero al final decidí quitarlo por redundancia. El PC te va diciendo el estado. La premisa del programa es un programa servidor que manda comandos y código 6502 a la NES en la forma de plug-in, los cuales simplemente son bloques de datos de 1K que se cargan en la RAM interna de la NES. Estos plug-in son muy flexibles y si se ve un cartucho que no puedes dumpear, puedes crearte tu mismo un plug-in.
Gracias a este aparato he podido dumpear muchos juegos hasta hoy desconocidos, aquí tenemos algunas fotos:


Sumario
Comprar un Kit o Conversión
Al ver la demanda he decidido hacer un pack con todos los componentes necesarios para el CopyNES. Además de esto vendo componentes sueltos. Si estas interesado en comprar algo puedes mandarme un email. Hazme saber que quieres y en que país vives para darte un coste de los portes. Acepto Paypal, cheques y dinero en metálico aunque lo mejor para todos es PayPal. A ser posible no me mandéis cheques.
Precios:
- Placa ------------------------ $12
- EPROM ------------------------- $6
- Cable IDC --------------------- $7
- Cable Macho-Macho DB25 de 6 pies $5
- Placa de 40 pines a placa ----- $6
- Placa + Cable de 40 pines + IDC $21
- Todo el kit + Placa + Cables -- $45
- Trabajo completo ------------- $125
NOTA: Si deseas comprar alguna parte rara como el 6522. Házmelo saber. Estaré muy contento de vendértela.
Puedo ofrecer varios kit si no necesitas todos los componentes.
Recomiendo encarecidamente comprar el cable IDC y la placa de 40 pines al conector si compras también una placa, el cable IDC es muy complicado de hacer, y la placa que se conecta es para gente con experiencia. Puedes conseguir esto que ofrezco sin mí pero si lo consigues aquí se te hará la vida más fácil. También sugiero comprar mi cable Macho-Macho DB-25 para asegurarte que es el correcto. No tiene nada de especial pero saldrá testeado y preparado para tu CopyNES.
Si usas mi kits, aquí esta la guía. El kit completo trae todo incluyendo el cable IDC. Solo te hará falta una NES.
Como es para una conversión, puedes mandarme una NES para modificarla. La modificaré y te la devolveré totalmente testeada :-).
Algunas personas han hecho funcionar cartuchos flash para CopyNES para software casero. Esto include un cartucho NRAM de 32K PRG y 8K CHR, un cartucho UNRAM con bancos de memoria para juegos de 128K. Para acabar estoy trabajando en un cartucho para las mappers MMC1/MMC3/MMC5. Postearé las actualizaciones cuando las termine.
Para acabar os pongo fotos:
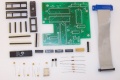
Contenido del Kit completo.

Placa Impresa
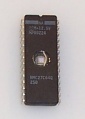
EPROM pre-programada.
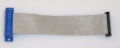
Cable IDC


Como hacer y crear un CopyNES
Como crear el cable IDC
Esto es un proceso difícil. Es mejor comprarlo ya echo pero si realmente quieres saber hacerlo aquí te diré como se hace:
Nota: Mucho cuidado con la clase de conectores IDC que se compra ya que hay dos tipos y en una clase de ellos los cables tiene que ser intercambiados. Hay que hacer que el pin 1 del DB-25 coincida con el pin 1 del conector IDC.
Paso 1
Necesitarás dos conectores IDC, algún cable y algo para presionar. Usé una prensa pero otras cosas pueden funcionar. Bajo ningún concepto puedes usar unos alicates o un martillo. Estos conectores deben tener una presión contaste o no harán buen contacto. Para conseguir esto usé una placa de metal y la prensa.

Paso 2
Pon el cable dentro del DB-25 de modo que la raya roja este al pin1.

Nota: No tube un cable de 25 cables por lo que usé dos cables sueltos. Esto hace que las cosas sean un poco más difíciles pero conseguir los 25 pines es posible.
Paso 3
Con cuidado ponlo en la prensa de modo que los cables no se muevan antes de que fijar el conector. Ten mucho cuidado con que el cable este perfectamente puesto.

Paso 4
Puedes usar con mucho cuidado un cuchillo para quitar el exceso de cable (los cutters pueden también valer).

Paso 5
Dobla el cable y encaja a presión la tapa para completar este lado. El cable debería salir de la tapa como se puede ver.

Paso 6
Ahora, fija el cable a través del conector de fila doble como se ve. El pin 1 deberia coincidir con la raya roja. Con el conector DB-25 visto como esta, el conector de doble fila deberian quedar hacia abajo. Un pequeño cable extra fuera no es un problema cuando se prensa.

Paso 7
Aplasta el conector, ajusta el exceso de cable y dobla el alambre alrededor poniendo una abrazadera encendida. Con esto ya se acaba el cable.

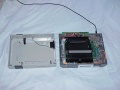
Fotos del prototipo de la NES
Este no se parece en muchas cosas al resultado final del montaje.
Panel frontal del CopyNES
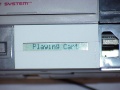
Primer plano del LCD
Vista general
Parte trasera de la NES
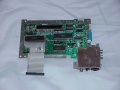
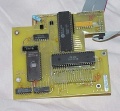
Parte superior de la placa instalada
Parte superior del CopyNES
Lado soldado de la placa
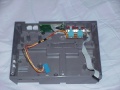
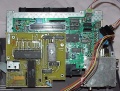
Vista interior de la mitad inferior
La CPU modificada de la NES
Socket modificado
Vista lateral del socket


NOTA: No tiene conectores para mando porque los perdí y no los encontré hasta después de hacer las fotos.
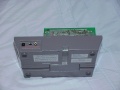
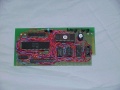
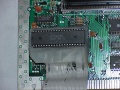
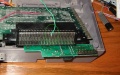
Fotos de la Placa
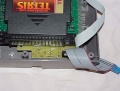
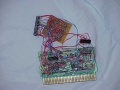
CopyNES montado: La placa puede ser vista en su estado normal, se puede ver que está en la parte trasera de la placa de la NES.
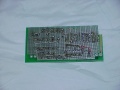
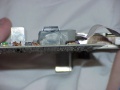
Placa vista trasera: La parte inferior de la placa. La cabecera de los 40 pines que conecta con la CPU está a la vista.
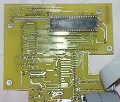
CopyNES montado: Aquí está el conector de la placa al socket de la CPU. Las muescas en la placa dicen por donde se monta la NES.
Placa vista delantera: La parte superior de la placa.


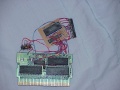
Cartucho NSF para CopyNES
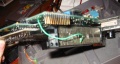
Puedes reproducir NSFs en un copynes sin tener que usar un plugin del winamp u otro reproductor en tu PC. Esto hará sonar los NSFs como en una NES real de modo que puedes oir que sonarán igual. Este cartucho en particular tiene 128K de RAM para guardar NSF y 8K de RAM para la area WRAM 6000-7FFF. Este cartucho usa un banco estandar en 5FF8-5FFF. La construcción de mi cartucho NSF es una desgracia pero, te enseñaré fotos de como hacerlo. Deberías de construir algun perfboard para el borde de la carta pero Nintendo pensó que usaría un gran espacio para los cartuchos el cual niega esta opción. Por culpa de esto tube que improvisar. A una placa de un Zelda 2 muerta le quité el MMC1 y la ROM. El CHR lo quedé allí ya que no molestaba. Todo el decodificor y los otros chips están simplemente soldados allí porque yo quiero, no hacen nada. El primer chip RAM que usé para descifrar el banco era demasiado lento, así que le pusé una cache de un viejo 486. No me atreví a quitar otra RAM porque el cuadrado de la perforado tenía un buffer tri-estado. Podría hacer un diagrama esquemático de esto si llegara el caso. El circuito está al menos aunque la contrucción sea complicada.
Cartucho NSF: Usé este cartucho debido a su estado para probar.
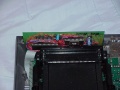
Placa de cartucho NSF, Vista superior: El perfboard en la parte superior contiene el buffer triestado y el chip de la RAM (el que era tan lento y no quité). El chip hacia fuera es el chip más rápido con un condensador soldado para evitar interferencias.
Placa de cartucho NSF, Vista inferior: Aquí esta la parte difícil. El decodificador 5ffx se compone por todos los chips soldados a la parte trasera de la placa. Se usa para controlar los 8 bancos de direcciones para el cambio de banco, además se usa para decodificar los 8K que van del 6000-7FFF.
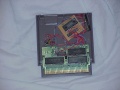
Placa de cartucho NSF, instalada: Como puedes ver realmente cabe dentro de la carcasa del cartucho.


Software para CopyNES
El programa se puede bajar para:
NOTA:
- Descomprime con la opción de guardar estructura de directorios.
- Si cambias los datos por defecto tienes que modificar el .INI.
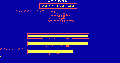
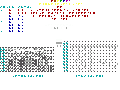
El menú principal: Desde aquí puedes seleccionar que deseas hacer.

Seleccionar categoría: Para dumpear un cartucho, primero elige la categoría del cartucho. Hay varias opciones como Mappers Comunes, Mappers no comunes, mappers de 3rd partys...
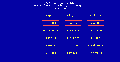
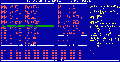
Pantalla de dumpeos: Después de seleccionar una mapper (MMC3 genérica en este caso), un fichero acabado en .NES se habrá creado. Después de esto, el proceso de dumpeo hará todo sólo. Si el cartucho tiene WRAM el mismo lo detectará.
Bankwatch: Bankwatch te mostrará alguna mapper de cartuchos desconocidos. Usando esta utilidad, podrás ver los secretos más íntimos de los cartuchos para saber como trabaja la mapper. Esta utilidad obviamente no esta echa para la mayoría de las personas pero ayudará a hacer ingeniería inversa a otras.

VRC 7 Instrument Tuner: Usando esto puedes escuchar el audio de los juegos. Esta función fue usada por mi para ajustar los instrumentos de tal forma que ahora es usada por muchos emuladores.
Selector NSF: Jugando un NSF con el cartucho del plugin NSF instalado en el CopyNES.
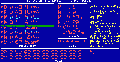
Microbug: Y finalmente, Microbug. Esto es un gran característica de gran alcance que dice el código del cartucho. Emula la PPU hasta cierto punto y por completo el código 6502. Lo usé para crackear la protección en el cartucho pirata del Earthworm Jim.
Microbug: Hay algunos códigos no-válidos. El núcleo del Microbug en CopyNES usa varios de ellos para que el código sea mucho lo más rápido posible.


Descripción Técnica (Inglés)
Basic operation is very simple. On powerup, the cartridge ROM is disabled, and CopyNES' internal 8K ROM is switched into 8000-FFFF. This allows stealing of the interrupt vectors. CopyNES' ROM is mapped into the NES' address space at 1000-1FFF and 3000-3FFF. Using this normally "occupied" space was done so the ROM data would not interfere with any known cartridge bankswitching, RAM, PPU, CPU registers, etc.
Once CopyNES is started, the "stolen" vectors point to the 1xxx area of memory which holds the basic startup code. The first thing that is done is to re-enable the cartridge. This is accomplished by writing to the port chip. (See schematic, below) Once this is done CopyNES then checks the status of one of the parallel port lines. Its state determines if we are in "copy" or "play" mode.
Play mode: CopyNES will play the cartridge that is inserted into the unit like normal. It will in all respects be a standard old grey box NES. All of CopyNES' ROM and port chip will be disabled perminantly until power is cycled, or until the reset button is pushed. once in "play" mode, that's it. If you do not have the Parallel Port cable installed, CopyNES defaults to play mode.
Copy mode: CopyNES will now be in slave mode, awaiting instructions from the PC via the parallel port.
Back to the hardware description. A 74157 was used to gate A12-A15 to the rest of the NES, along with an OR gate which gates A11. When in copy mode, this 74157 is used to "shut off" the rest of the NES (and any plugged in carts) so that CopyNES' ROM or port chip can have the bus, without interference from the PPU, cart, RAM chip, etc. During these accesses, the NES sees 4800-4FFF only. A 74138 is used to decode the upper address lines to net us 1000-1FFF, 3000-3FFF, and 4000-4FFF. The latter is run to the port chip which also uses A11 to map it in at 4800-4FFF. One of the I/O lines from the port chip runs up to the enable on the 74138 directly. When the NES is reset, the port chip's pins are all turned into inputs so the 4.7K resistor pulls the line up to the 74138 so it will be high when the system comes up (and hence, enabled). If a 0 is written to this port bit (and the port is set to an output), the decoder will be disabled. Without it, all address decoding ceases, and hence the port chip can no longer re-enable it.
Another output is used to enable the cartridge space over-ride for when CopyNES starts up. It operates in a similar fashion to the above, however, it does not affect the 74138's decoding and can be turned on and off at will. During startup, it too is pulled up with a 4.7K resistor so that the cartridge over-ride will occur. The port bit is gated with A15 through a NAND gate, which is then fed into another NAND gate along with decoded outputs from the 74138 for CopyNES' ROM. If either 1000-1FFF, 3000-3FFF, or (when enabled by the port chip) 8000-FFFF are selected by the processor, the NES section is disabled and the ROM is put on the bus. One last NAND gate was used to make the ROM "act nice" by only allowing it to be enabled when M2 and R/W are both high.
The remainder of the port chip's I/O lines are used to interface with the PC and the LCD display. The LCD display is a simple Hitachi-style controller version which can be picked up very cheaply at any surplus electronics store or catalog. Typical cost is $5 to $10. I used a 16*1 character display, but you can use anything you have. The LCD's R/W is tied to ground to put it in write mode all the time. Note that if the PC's parallel port is in output mode, you cannot write to the LCD (since the port chip doesn't have enough "oomph" to overpower the PC, even with the 160 ohm resistors). Fortunately, this has never been a problem.
Software Stuff
CopyNES is even fairly simple from a software standpoint. I wrote the host code in QBASIC (yeah, don't laugh! :-) and it isn't too shabby on this PC (Celeron 300a). CopyNES itself has all its code written in 6502 ASM of course. I developed the code on two PC's at once using an EPROM emulator for CopyNES. Once the code was "blessed", I burned it to an EPROM. CopyNES' code has several things on it other than just the raw interface. It has a CRC-32 routine (for figuring out ROM sizes when it would be tough to do a side-by-side ROM bank comparison), and the NSF player, along with a few stock routines such as loading the PPU address, checking for the existance of WRAM, etc.
CopyNES' real advantage is the plugins it uses. These are simply 1K worth of data that sit at 0400-07FF in the NES' standard 2K of RAM. When you go to read a cart, the PC host software will reset the NES, download the plugin, then execute it. The plugin then takes over and does all ROM size calculation, mirroring check, WRAM checking, and anything else that needs to be done. I have written plugins for every type of cart I own. The PC host software has a menu thingy that lets you select what you want to do (read a cart, play an NSF, etc). On the cart reading portion, you then select what type of cart it is by board number and then enter a filename. Once you do that, it will do the rest. The output is a fully-formed .NES (and coming soon, .UNIF) file ready for use! No mirroring screwups, no doubled-up ROMs, etc. And since this is a fully-functional NES, you can test the cart after you insert it *before* you copy to make sure it's in right! This should eliminate all bad cart reads.
Add-Ons
So far, I've made a simple 32K/8K RAM cart that allows the testing of code. This is nothing more than a Super Mario Bros. board that has had its ROMs removed and RAMs installed, with some very minor re-wiring. It fits back into its cart case since it does not need sockets, and therefore no holes drilled in the case. Since it's RAM, it needs no (E)EPROM programmer or anything like that. The cart stays in the NES and after the data is loaded, it is automatically run. Total time is under 15-20 seconds to load up a complete 32K+8K ROM and play it!
The other add-on is an NSF cart. This is a 128K RAM cart with the standard NSF-style 5FFx bankswitching, as well as RAM at 6000-7FFF. I heavily modified a dead zelda 2 board. I'm not too proud of how I wired it up- chips soldered under the chips soldered to the board, chips dangling on wires, etc :-). However, it fit back into a standard cart case, and more importantly, *it works*. I have tested all the NSFs in the NSF collection on it and fixed all the ones that didn't work on it. I will post a schematic of this once I draw and scan one in.
The Good Stuff
Here is CopyNES' schematic. I drew it up and scanned it in :-). Beats using the computer. Notes: I made a special adaptor that is soldered into the place where the NES processor sits on the main board. This adaptor has a socket on the top where the processor then plugs, and a ribbon cable (34 pins, I chopped up an old floppy cable!) attached to it which then runs to the add-on board which houses the port chip, EPROM, and the logic chips. I used the bottom half of an IDC connector (the part with the pins only) and a standard 40 pin DIP socket. I soldered the pins of the socket directly to the tops of the IDC connector where the wire would normally go. I soldered all pins in this fashion except A11-A15 since these are run to the add-on board and then back to the rest of the NES. After this was done, I attached the ribbon cable to A0-A10 (which goes to both the add-on board and the NES), A11-A15 (NES processor only), A11-A15 (NES board only), D0-D7, R/W, M2, /RESET, ground, and 5V. That's 34 wires. After this was done and verified working, I potted (completely coated) the whole mess in hot melt glue. The hot-melt seals and holds everything together so it will not move, break, or otherwise cause trouble. Heck, it doesn't even look too bad! It looks basically like this white block of plastic with a socket on top, pins on the bottom, and a wire poking out the side :-). I soldered this adaptor directly to the NES board since there would not be enough height clearance otherwise (read: the top of the CPU hit the bottom of the plastic NES case). Other than the adaptor, the rest of this circuit is very easy. Note that I left A0-A10, D0-D7, and R/W, /RESET, M2, and a couple other things off of the port chip and other stuff. This is because A0 always goes to A0 on everything, A1 always goes to A1 on everything, etc. Putting them all on would've made for a hard to read schematic. Also, don't forget to add in bypass caps very close to the power pins on every chip. These and power lines were not shown.

Modificar CopyNES para poder usar Cartuchos Flash
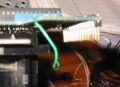
Ahora que tu CopNES está instalado y funcionado puede que gustara añadir un cable para poder programar cartuchos de desarrollo. Para hacer esto necesitarás una pieza de cable de 24-26. En mi caso usé cable telefónico. Puedes soldarlo en la expansión del conector o en el conector del cartucho. El método del conector del cartucho se ve primero y al final está el de la expansión. Puedes elegir el que quieras.
Soldar en el círculo verde: Cuenta 16 pines desde el lado derecho. Aquí es donde pondrás el cable. Añade una pequeña soldadura a la base donde esta el pin y sueldalo. Esto hará más fácil que se quede allí. Lo siguiente es pelar el cable para soldarlo también. Para acabar soldalo al pin.
Cartucho del Pin soldado:Gira el cable y la placa del CopyNES será mostrada. El cable está soldado en CN4 (solo tiene un pin). Con esto has terminado el añadido.
Placa de CopyNES soldada: Aquí puedes ver desde otra vista las fotos. Lo siento pero mi cámara no es tan buena como debería.


Puedes enganchar encima del alambre el conector inútil de la extensión si deseas. Esto permitiría un retiro más fácil del conector del cartucho si quieres. Para llevar a cabo esto suelda el 7º PIN desde la izquierda, en la primera fila que veas. Puedes confirmar este pin con un metro si quieres, comprueba continuamente que está entre él y el pin 16 del conector de cartucho. Nota que ese pin 1 esta con la energía, no lo olvides.